 +1 855 796 4355
POS: – Retail Report Development & Configuration.
Introduction:
There is server requirement from client, that They required few Reports and KPI directly on the POS on store. Like Sales by Hours or sales by Item. This report run against the retail channel Database which is connected to that specific terminal.
This report is not too complex to develop on other word you can say its does not required any heavy development for these reports. it required on XML report definition, SQL Query for the Data or as requirement of column.
In Below Presentation, I will demonstrate you “ Sales by Sale Person” Report. This report is most commonly request from client.
Step 1:
Open the AX Client and goto Retail -> Setup -> Channel Report Configuration

Open Channel Report Configuration.

Click on New Button, Once you click on New button Provide New Report ID :- 114 and Description :- Sales by Sale Persons
In Report Details Section, select POS Permission Group in Permission Group fields
For E.g. if casher want to run or view this report then select Cashier or if only Manager can view or run this report then select Manager.
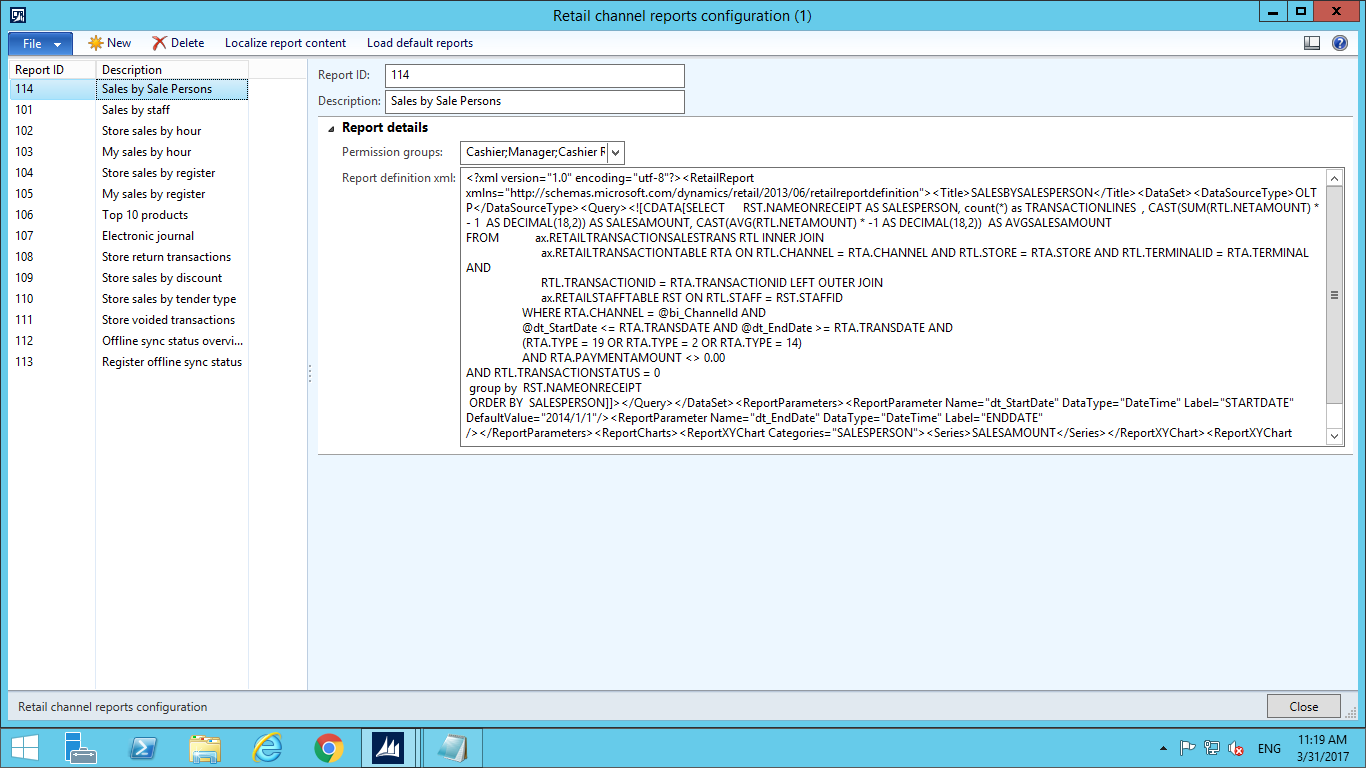
Report Definition XML, here you can develop the report.
With below code. Which is combination XML report definition, SQL Query.
<?xml version="1.0" encoding="utf-8"?><RetailReport xmlns="http://schemas.microsoft.com/dynamics/retail/2013/06/retailreportdefinition"><Title>SALESBYSALESPERSON</Title><DataSet><DataSourceType>OLTP</DataSourceType>

<Query>

<![CDATA[SELECT RST.NAMEONRECEIPT AS SALESPERSON, count(*) as TRANSACTIONLINES  , CAST(SUM(RTL.NETAMOUNT) * - 1  AS DECIMAL(18,2)) AS SALESAMOUNT, CAST(AVG(RTL.NETAMOUNT) * -1 AS DECIMAL(18,2))  AS AVGSALESAMOUNT

FROM ax.RETAILTRANSACTIONSALESTRANS RTL INNER JOIN

ax.RETAILTRANSACTIONTABLE RTA ON RTL.CHANNEL = RTA.CHANNEL AND RTL.STORE = RTA.STORE AND RTL.TERMINALID = RTA.TERMINAL AND

RTL.TRANSACTIONID = RTA.TRANSACTIONID LEFT OUTER JOIN

ax.RETAILSTAFFTABLE RST ON RTL.STAFF = RST.STAFFID

WHERE RTA.CHANNEL = @bi_ChannelId AND

@dt_StartDate <= RTA.TRANSDATE AND @dt_EndDate >= RTA.TRANSDATE AND

(RTA.TYPE = 19 OR RTA.TYPE = 2 OR RTA.TYPE = 14)

AND RTA.PAYMENTAMOUNT <> 0.00

AND RTL.TRANSACTIONSTATUS = 0

group by  RST.NAMEONRECEIPT

ORDER BY  SALESPERSON]]>
</Query></DataSet>

<ReportParameters><ReportParameter Name="dt_StartDate" DataType="DateTime" Label="STARTDATE" DefaultValue="2014/1/1"/><ReportParameter Name="dt_EndDate" DataType="DateTime" Label="ENDDATE" />

</ReportParameters>

<ReportCharts>

<ReportXYChartCategories="SALESPERSON"><Series>SALESAMOUNT</Series></ReportXYChart>

<ReportXYChartCategories="SALESPERSON"><Series>TRANSACTIONLINES</Series></ReportXYChart>

<ReportXYChartCategories="SALESPERSON"><Series>AVGSALESAMOUNT</Series></ReportXYChart>

</ReportCharts></RetailReport>
Report Definition XML Explanation
- XML Report Definition
Below Part is XML Report Definition of POS Report.
<?xml version="1.0" encoding="utf-8"?><RetailReport xmlns="http://schemas.microsoft.com/dynamics/retail/2013/06/retailreportdefinition"><Title>SALESBYSALESPERSON</Title><DataSet><DataSourceType>OLTP</DataSourceType>
- SQL Query
With help of SQL Query, you can set report logic. For Sales by Sales Person report below is SQL Query. You can also use stored procedures.<Query> <![CDATA[SELECT RST.NAMEONRECEIPT AS SALESPERSON, count(*) as TRANSACTIONLINES , CAST(SUM(RTL.NETAMOUNT) * - 1 AS DECIMAL(18,2)) AS SALESAMOUNT, CAST(AVG(RTL.NETAMOUNT) * -1 AS DECIMAL(18,2)) AS AVGSALESAMOUNT FROM ax.RETAILTRANSACTIONSALESTRANS RTL INNER JOIN ax.RETAILTRANSACTIONTABLE RTA ON RTL.CHANNEL = RTA.CHANNEL AND RTL.STORE = RTA.STORE AND RTL.TERMINALID = RTA.TERMINAL AND RTL.TRANSACTIONID = RTA.TRANSACTIONID LEFT OUTER JOIN ax.RETAILSTAFFTABLE RST ON RTL.STAFF = RST.STAFFID WHERE RTA.CHANNEL = @bi_ChannelId AND @dt_StartDate <= RTA.TRANSDATE AND @dt_EndDate >= RTA.TRANSDATE AND (RTA.TYPE = 19 OR RTA.TYPE = 2 OR RTA.TYPE = 14) AND RTA.PAYMENTAMOUNT <> 0.00 AND RTL.TRANSACTIONSTATUS = 0 group by RST.NAMEONRECEIPT ORDER BY SALESPERSON]]> </Query></DataSet>
- Report Parameter
This Dataset you to define report input parameter. In this Example Start date and End Date is Input parameter. When user want check data with specific date range then he can enter start and End date.
<ReportParameters>

<ReportParameter Name="dt_StartDate" DataType="DateTime" Label="STARTDATE" DefaultValue="2014/1/1"/><ReportParameter Name="dt_EndDate" DataType="DateTime" Label="ENDDATE" />

</ReportParameters>
- Report Charts
Report chart is used to Display chart on fields which you define in SQL Query Section. Here in this Example, I define SALESAMOUNT, TRANSACTIONLINES & AVGSALESAMOUNT.<ReportCharts> <ReportXYChartCategories="SALESPERSON"><Series>SALESAMOUNT</Series></ReportXYChart> <ReportXYChartCategories="SALESPERSON"><Series>TRANSACTIONLINES</Series></ReportXYChart> <ReportXYChartCategories="SALESPERSON"><Series>AVGSALESAMOUNT</Series></ReportXYChart> </ReportCharts></RetailReport>
Step 2:
Once Step 1 is completed, we need to set this report to POS. so that user can use this report.
We need to run job for the Report to all channel.
In AX, go to Retail -> Periodic -> Data distribution -> Distribution schedule
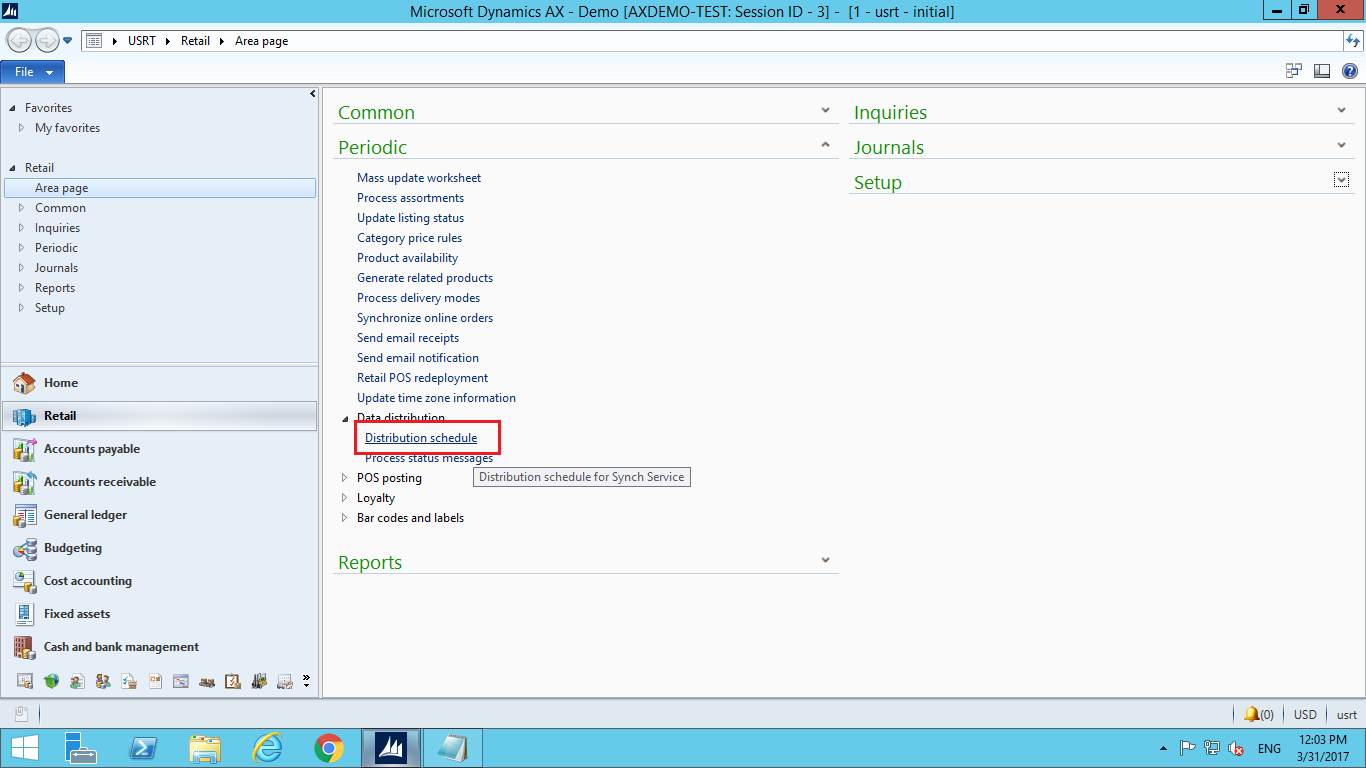
Run the JOB ID: – 1110. And wait for couple of minutes to complete the job. After Complete the Job Open AX POS and Go to POS Report. You will be able to see Sales by Sales Person Report.
Conclusion:
By Using, XML Report Definition, SQL Query, Report Parameter and Report Chart you can develop POS Report.