Category Archives: Power Plattform
Call Flow from Canvas Power App and get response
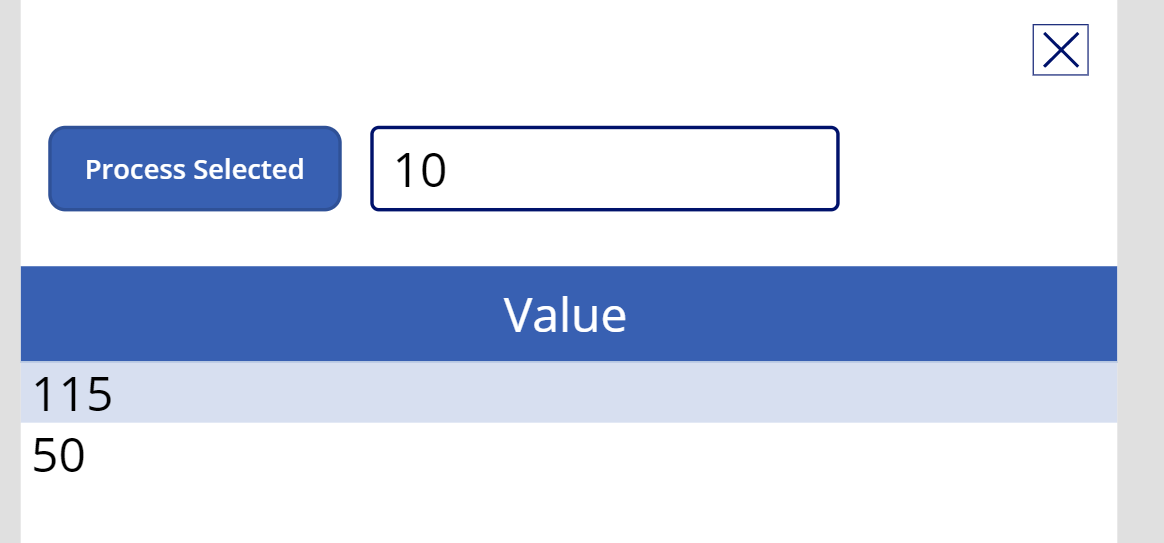
One of the most commonly searched topic is being able to Run a Flow from a Canvas App. And this has been demonstrated by many users over a period of time. This is my attempt to summarize the same. Hopefully, this will clear out in a simpler way!! Scenario In this scenario, I will call a Flow using a Button and send the number in the TextBox, the Flow will do some calculation and I will get back the result which I’ll use to store and utilize. Simple! Create a Flow Let’s see how you can add a Flow to Canvas Power App – Before we begin, remember, only the Flows which are outside a solution will be recognized inside a Canvas App. Here is my Cloud Flow. Since the Trigger of the Flow is a Canvas Power App, I’ll search for PowerApp in the Connectors and select the PowerApps connector.It has 1 trigger which is called as PowerApps. Once I select, I start the Flow with the trigger and then I’ll go on to declare 2 variables to do a simple operation. Now, I want to request Number 1 in the Canvas PowerApp which will be passed to the Flow.So, in the Dynamic content, you’ll notice Ask in PowerApps As I select this, a variable will be auto-created with will be the name of the variable “Number 1” (spaces will be removed), followed by _Value. Hence, resulting in Number1_Value. Next, I’ll create another variable to just multiply these 2 numbers together and produce a result. So, here’s my third variable. (Just for the sake of this example 😊) Now, to send back a Response to the calling Canvas PowerApp, I’ll again search for PowerApps connector in which and then look for the Action which is called as Respond in Power App Once I select that, I can then pass on my variable which is a result of my calculation. And I’ll send the result back to the calling PowerApp. Accepting Parameters in Flow from Canvas App Let’s look at the other part of the implementation where I will have a button pass value to the Flow and get back results. In my Canvas App, I have this structure where I have a Textbox called ‘ValueToSend‘, a button called ‘ProcessButton‘ and a DataTable called ‘ResultTable‘ to show the result. Now, in order to add a Flow on the trigger of the Process Selected button, I’ll select the button first and then make sure OnSelect is highlighted and then follow the step below. Now, let me add the Flow to the App first. I’ll navigate to Action and click on Flow. Upon selecting Power Automate, I’ll be shown all the Power Automate Flows detected by the App. Remember, only ones NOT in Solutions will be detected and available for selection. Upon clicking it, it will be added to the Power App and appear in the Data above and the Flow will be ready in the Formula Bar for you to complete calling it. Now, as you click on the Formula Bar to start writing the Flow, you’ll be asked the first parameter which we added as Ask In PowerApps in our Flow above. So, I’ll enter the TextBox which I had created i.e. ValueToSend, for example. And then close the Flow and then enter a dot to select the Outputs for Flow has to offer.As you see, I can now select the Output Parameters which we had selected. Once I select that, the Flow will send the value that I pass and collect back the calculatedValue from the Flow. Now, this is not stored anywhere, so it’s recommended you store it in a Variable/Collection for your use later.In my case, I’ll add it all to a Collection to populate the DataTable later on. Hence, I’ll add the entire thing to the Collect() method Next, since I want to display thee result in the label, I’ll assign the Label’s Text property to the variable I created above and collected Flow result in. Now, let’s Run this example. Running Now, when I call the Flow by pressing the button once I enter some value, the result will be calculated and the Collection will store the answers sent back by the Flow and it’ll keep adding to the collection on each request. Likewise, your scenario could be anything per your implementation. First call to Flow Second call to Flow Hope this was useful!!
Share Story :
Retrieve characters/Substring from string in Cloud Flows
In this blog we will see how to retrieve string or characters from string using substring and take method When we want to retrieve character/string from starting index then will use take() method, else will use substring() Let say we want to retrieve first 5 character from string. Eg. – string is Power Automate We will demonstrate this with both the cases. Using Substring Here we are retrieving first 5 characters from string i.e. Power Expression used – substring(‘Power Automate’,0,5) Output – 2. Using take Expression used to retrieve string – take(‘Power Automate’,5) Output – Hope this helps!
Share Story :
Last and First expression in Cloud Flows – Part I
Let see how we can use last and first expression in Cloud Flows. We can use last and first expression get first and last value in array, strings and also we can use first and last expression to get first and last record from list of records in cloud flows Let get started!!!!! Let say you have string named “A Datum Integration” and we want first character of the string, then use below expression. Syntax – first(<string>) I have initialized a string “A Datum Integration”. Add a compose and use first as below. As a result, will get a first character from the string i.e A Output – 2. Similarly, we can use last expression to get last character from the string. In this case character “n” should be output Syntax – last(<string>) Output – Stay tuned for Part II.
Share Story :
Last and First Expression in Cloud Flows – Part II
We have already seen how to extract character from string in Cloud flows. Let see how we can get first and last value in array. I have array of list of records (account records), want to get 1st value in array. Array – Add a compose step in flow and use below syntax to get first value. Syntax- first(<array>) Output – Similarly, we can get last value in array. Syntax – last(<array>) Output – Hope this helps !
Share Story :
SEARCH BLOGS:
[gravityform id="36" ajax="true"]

Anil Shah, CEO
Lorem ipsum dolor sit amet, consectetur adipiscing elit. Ut elit tellus, luctus nec ullamcorper mattis, pulvinar dapibus leo.